
Summer is over, and our gardens are slowly slipping into their winter sleep. For perennials, it is a much needed rest to recharge for next year. For most annuals, though—there’s no nice way to say this—they are at the end of their life cycle. (To learn more about annuals, see The Garden Decoder: What Are ‘Annuals’ ?) The reason for this is most of our annuals are not hardy enough to survive the freezing temperatures of winter. Many that you see in summer garden beds are tropicals that enjoy zones 10 through 13, with some tolerating zone 8 or 9. This is why if you’re a northerner visiting friends down south, you may see what you consider houseplants growing outside, in-ground.
With a few tools and a sunny window, you don’t have to say goodbye to all the annuals growing in your garden. Simply make some cuttings, propagate them, and re-plant them outdoors next summer.
Photography by Joy Yagid for Gardenista.
Which plants can be propagated?

For this story, we are focusing on plants like coleus, begonias, common geranium (Pelargonium ssp.), crotons, and maybe rosemary and sage. (Rosemary and sage can technically over-winter, but a deep freeze will kill them.) This is not an extensive list. If you have other plants, there’s no reason for you not to try. Just follow the directions below.
These plants mentioned above represent two of the three types of plants that are amenable to cuttings. The first grouping is known as softwood—a bit of a misnomer since they rarely or never get woody. Rosemary and sage are in the semi-hardwood category. The last category is hardwood; shrubs and trees are part of this category and outside the scope of this article.
What tools do you need?

- Sharp knife or pruners
- Scissors
- Nursery pots
- Glass jars
- 10 percent bleach solution
- Sterile potting mix
- Plastic bags
- A window with bright indirect light
The cutting tools and the containers need to be clean and sterilized as much as possible. The tools should be wiped down with 10 percent bleach solution. Don’t worry about rust too much. Once the season is over, you can give your tools a spa day (see Expert Advice: How to Get Rust off Tools). The containers should be washed to remove any dirt or debris and sterilized in the 10 percent bleach solution. Glass jars can be run through the dishwasher or hand washed and left to air dry.
How do you choose the right plant?

Plants need to be healthy. Look for vigorous and strong growth. Avoid plants that have visible disease or pest infections. Also avoid plants showing frost damage. Most tropicals can tolerate some chilly nights without harm, but wilted leaves after a too cold night means the plant’s vascular network has been damaged and that it belongs in the compost pile.
As for insects: Carefully inspect the plant. You want to look under leaves and in the nooks and crannies for hidden insects. You can wash them off or gently remove them with your fingers. (Smaller potted plants that you want to bring inside can be debugged by following the instructions here.)
How do you make cuttings?

1. Look at your plant and find the healthiest, strongest stems. The closer you can cut to the base of the plant, the better. Taking a cutting closer to the roots increases the chances of rooting.
2. Using the knife or the pruners, make a clean cut to remove the cutting without damaging other possible cuttings. As you continue to take cuttings, make sure to dip or wipe your knife or pruners in a 10 percent bleach solution between cuts.

3. Once you have your cuttings, remove any blooms or leaf buds that look like they could be flowers.
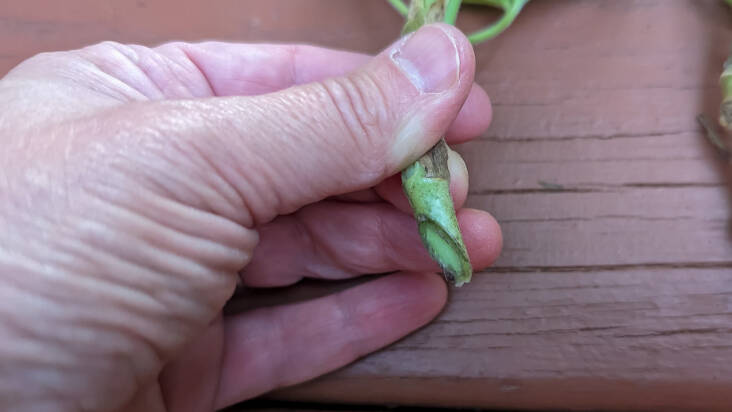
4. Trim the bottom of the stem on an angle so that the entire cutting is about six inches long.
5. Using scissors, trim back the leaves about a third to relieve stress on the cutting. Less leaf coverage means less work for the plant and allows it to focus on growing roots.
How do you root the cuttings?

There are two ways. The easiest is to plop them in a glass jar with water and place it in a bright window, out of direct sunlight. Your cuttings just went through quite a bit and are in a fragile state. No direct sun for them at this time. Change the water daily.
The other option is using sterile potting soil and rooting hormone. Rooting hormone is just that—a product that helps plants make roots.
After you have your cuttings, fill small growing pots with soil. The soil should be damp. Make a hole with a stick or your finger to receive the cutting. Dip the cutting in the rooting hormone, about an inch deep, and insert it in the hole. Tap the soil down around the cutting.
One more additional step may be needed. Since winter indoor heating tends to be dry and overall humidity levels are low, you can cover the now potted cuttings with a plastic bag to increase humidity. This process can yield faster results but needs more attention. You need to make sure the soil never dries out or becomes too wet. You have to monitor for fungus infections. You can’t let the plastic bag touch the leaves. The plastic bag can be removed after a week to 10 days depending on how dry your home is.
How to tell when you’ve succeeded?
For the ones propagated in water—it’s easy! Once you see the roots, move them into soil-filled pots, avoiding direct sunlight for a week or so. Moving them into pots can cause root damage, so be extra kind to them for a week or so.
For the ones in the soil. The most obvious sign is new top growth. However, if it’s been a while without new growth, check with a gentle tug on the stem. If a very gentle tug on the stem is met with resistance, you have roots.
Finally remember the amount of light inside is remarkably less than what your plants were used to inside. They may show their unhappiness by dropping leaves. This is normal. Give them time and and some TLC, and they will recover.
See also:
- DIY: How to Store Dahlia Tubers in Winter
- Houseplants 101: How to Propagate Plants
- 10 Easy Pieces: Garden Pruners


Have a Question or Comment About This Post?
Join the conversation