Icon - Arrow LeftAn icon we use to indicate a rightwards action. Icon - Arrow RightAn icon we use to indicate a leftwards action. Icon - External LinkAn icon we use to indicate a button link is external. Icon - MessageThe icon we use to represent an email action. Icon - Down ChevronUsed to indicate a dropdown. Icon - CloseUsed to indicate a close action. Icon - Dropdown ArrowUsed to indicate a dropdown. Icon - Location PinUsed to showcase a location on a map. Icon - Zoom OutUsed to indicate a zoom out action on a map. Icon - Zoom InUsed to indicate a zoom in action on a map. Icon - SearchUsed to indicate a search action. Icon - EmailUsed to indicate an emai action. Icon - FacebookFacebooks brand mark for use in social sharing icons. flipboard Icon - InstagramInstagrams brand mark for use in social sharing icons. Icon - PinterestPinterests brand mark for use in social sharing icons. Icon - TwitterTwitters brand mark for use in social sharing icons. Icon - Check MarkA check mark for checkbox buttons.
You are reading

DIY: Flowerpot Pendant Light

Search

DIY: Flowerpot Pendant Light

November 11, 2020

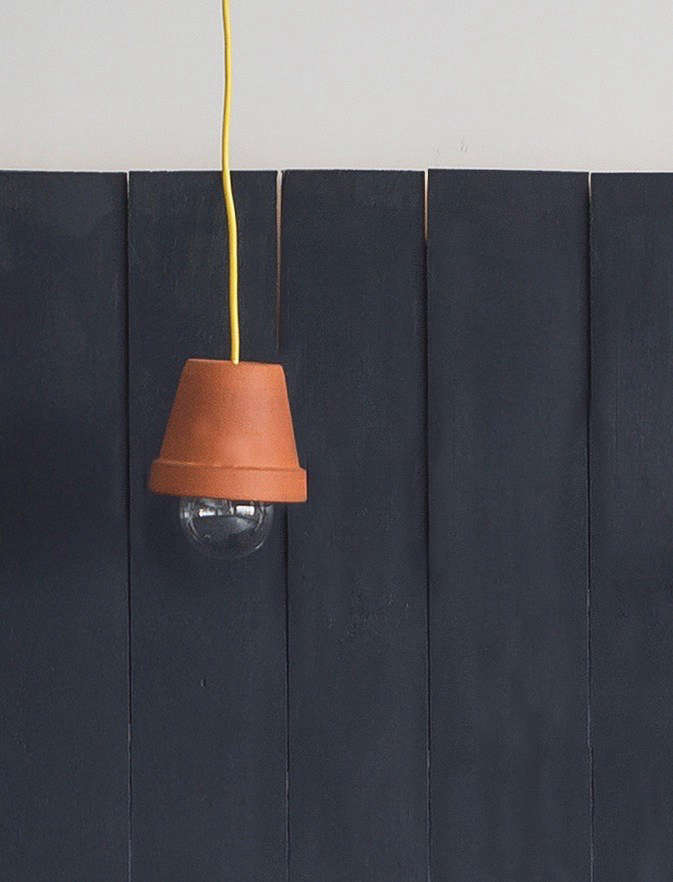
When we were brainstorming for ideas to include in the DIY chapter in our new Gardenista book, the flowerpot pendant light made the final cut because it was practical—and made us smile every time we looked at it.

Inspired by a design by Australian eco-gardener Joost Bakker (who is famous for using terra cotta in unusual ways), our flowerpot pendant lamp has its own personality, including a yellow cord (because: sunshine) and a globe incandescent lightbulb to cast a soft, flattering light.

See materials and step-by-step instructions below:

Photography by Matthew Williams for Gardenista.

Above: Stylish and practical, the flowerpot pendant light is one of 10 easy DIY projects in our Gardenista book.

Materials

Ready to assemble.
Above: Ready to assemble.

Step 1: Snip

Use the wire cutters to snip off the pendant cord&#8\2\17;s plug.
Above: Use the wire cutters to snip off the pendant cord’s plug.

Step 2: Strip

Use a wire stripper to strip off about a half inch of casing to expose the two wires on the cord&#8\2\17;s open end. Follow the installation instructions included with your plug to attach the wires to the plu
Above: Use a wire stripper to strip off about a half inch of casing to expose the two wires on the cord’s open end. Follow the installation instructions included with your plug to attach the wires to the plu

Step 3: Paint

Cover a work surface in a well-ventilated room or outdoors with a drop cloth. Paint the cord with two coats of glossy yellow spray paint. Let dry between coats.
Above: Cover a work surface in a well-ventilated room or outdoors with a drop cloth. Paint the cord with two coats of glossy yellow spray paint. Let dry between coats.

Step 4: Assemble

Thread the cord through the terra cotta pot&#8\2\17;s drainage hole (the light socket end must be inside the pot.
Above: Thread the cord through the terra cotta pot’s drainage hole (the light socket end must be inside the pot.

Follow the installation instructions included with your plug to attach the wires to the plug.

Step 5: Screw In

After assembling, screw in the lightbulb.
Above: After assembling, screw in the lightbulb.

Suspend the pendant light from a hook in your porch ceiling or covered overhang.

See more of our favorite DIY projects in our new book, Gardenista: The Definitive Guide to Stylish Outdoor Spaces.
Above: See more of our favorite DIY projects in our new book, Gardenista: The Definitive Guide to Stylish Outdoor Spaces.

N.B.: More of Alexa’s favorite DIYs to try:

(Visited 333 times, 1 visits today)
You need to login or register to view and manage your bookmarks.

Product summary  

Have a Question or Comment About This Post?

Join the conversation

v5.0