Our Novice Gardener, Meredith, is lucky enough to have a little view from her San Francisco apartment–on a clear day, she can see downtown, San Francisco Bay, and Marin County, or at least a sliver of all three. But from the day she’s moved in, all she really sees through the windows are three phantom window boxes.
Why not make them a reality? It’s a ground floor apartment, she’s handy with a hammer, and after a year of experimenting with container plants, it’s time.
First, a quick note: If you’re not in the mood to do it yourself, The Home Depot carries several styles of all-wood window boxes like this 40-Inch Planter from Pennington. But there’s nothing quite like the look of furniture that perfectly fits the dimensions of a space, is there?
Photography by Liesa Johannssen.
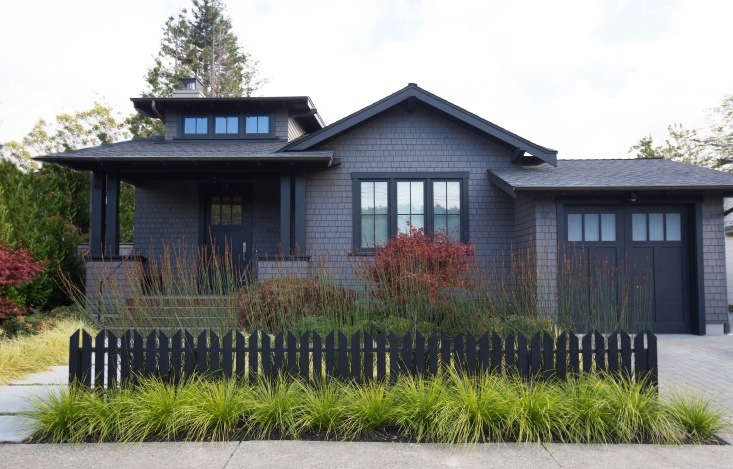
Finished Product

Above: Black is hard to beat for a window box. Because all three of the windows are different lengths, Meredith made custom boxes for a perfect fit.
Materials
- Rough Cut Redwood Lumber. Purchase lumber in a width equal to the width and depth you want for your planter box.
- Galvanized #8 Common Nails; Meredith used 2-inch nails, but these 3-1/2-inch nails would work just as well (or better; longer means sturdier, but be sure to pre-drill holes); $4.24 for a 1-lb. box from The Home Depot.
- Appropriate mounting materials; this depends entirely on the conditions of your home. At Meredith’s, galvanized wood screws and heavy-duty Corner Braces did the job.
- Optional: If you want to make cuts yourself and anticipate more wood projects in the future, invest in a small woodworking power tool, such as the Ryobi 14-Amp 10-Inch Compound Miter Saw; $119 at The Home Depot. (Alternately, you’ll need to hire a woodworker or contractor to make cuts for you.)
Instructions

Above: Meredith used Rough Cut Redwood Lumber for two reasons: First, redwood is resistant to water damage (along with several other varieties of wood). Second, rough-cut boards are cheap and almost impossible to make into something perfect; rough-cut lumber is the ideal antidote to any perfectionist tendencies you may have.
If you’ve never purchased lumber, here’s the 101: The easiest way to start is to choose a depth and width for your boxes that is the same size as commonly stocked lumber. For example, Meredith wanted boxes to be 8 inches wide and 8 inches deep, so she bought 1-by-8 boards: 1 inch thick, 8 inches wide. (Keep in mind that these dimensions are inexact, called “nominal.”) As for length, find a location of The Home Depot that will cut wood (most do, but not all). Know what length will fit in your car, then ask to have your boards cut accordingly. (For example, have a 12-foot board cut in half to fit your car, and make the rest of your cuts at home.)

Above: After your lumber is cut to size, set up your box and make sure all the pieces are square. (If they aren’t, cut or sand accordingly until they are.) Measure and mark where nails should go.

Above: Meredith used 2-inch galvanized nails (they won’t rust) and pre-drilled holes about every 6 inches or so. (The more nails, the sturdier the box. For extra strength, consider using an exterior adhesive.) She upgraded the drill kit to the Ryobi 18V One+ Lithium-Ion Drill; $79 at The Home Depot.

Above: After she nailed the box together, she drilled drainage holes using the 1-inch bit from the Bosch Daredevil Spade Bit Set; the 6-piece set is $9.97 at The Home Depot.

Above: Meredith sanded the boxes using a Dremel Multi-Max Oscillating Tool Kit, a tool with a surprising number of uses; $79 at The Home Depot. With rough lumber, the wood never would be perfectly smooth, and it’s really not the point. (She didn’t even use a sandpaper finer than 60 grit.) For this project, you sand to prepare the surface for paint; free yourself from trying to make the wood look perfect. Just get rid of the biggest splinters and roughest patches.

Above: Wood will take on water and eventually rot; slow the process by treating the wood with a paint or stain. Meredith wanted a glossy black finish, so she used Behr Premium Plus Ultra Semi-Gloss Enamel Exterior paint featuring a mildew-resistant finish; one gallon is $39.98 at The Home Depot. She used a Purdy XL 3-Inch Angled Sash Brush; $13.48 at The Home Depot.

Above: Careful installation is critical. Window boxes are heavy when filled with soil and plants, and if people can walk below the boxes, it’s imperative that they be completely secure. Meredith’s apartment has a stucco exterior wall and a heavy window frame. The first step to mounting the boxes: she drilled into the frame with a Carbide-Tipped Drill Bit (for drilling through stucco) to see what she had to work with. Behind the stucco was heavy wood framing, from which it was safe to hang the boxes.

Above: Be sure to set the boxes away from the exterior wall a few inches to minimize the potential for water damage.

Above: In choosing plants for the box, she started with pairs of dwarf boxwood from The Home Depot; $5.98 for a 1-gallon plant. She planted them in a 50/50 mix of regular potting soil and EcoScraps Garden Soil Mix; $6 for a 1.5-cubic foot bag at The Home Depot.

Above: She added more plants including New Zealand flax; two varieties of ivy; liriope; Jerusalem sage, and silver morning glory. Finally, the windows look appropriately dressed. The boxes sit directly off the living room, and Meredith is enjoying the view.


Have a Question or Comment About This Post?
Join the conversation