A good garden is always in flux, introducing new colors, and textures throughout the season. The same can be said for the best bouquets. But while we celebrate the vicissitudes of nature, we tend to think of the cut floral arrangement as static. Frustration ensues as some flowers fade before the rest, or if overeager specimens that continue to grow after being snipped disturb the structure of our composition. Cut flowers never seem to last long enough.
But like plants in the garden, a bouquet is a living thing. It evolves as blooms open, follow the light, and die every day. So why fight Mother Nature? After you learn to embrace this evolutionary nature of a floral arrangement, you may learn to delight in its changeability.
Photography by Justine Hand for Gardenista.
Day 1

Above: My choices: fresh spring blooms from Winston Flowers included lilacs, ranunculus, narcissus, and leggy French tulips.

Above: I also chose grape hyacinths and sweet peas for their more demure stature.

Above: Freshly arranged, my bouquet added a much-needed touch of spring to the Halloween Hall decor that I never took down!
Rather than reduce the dramatic heights of my larger blooms to bring them into scale with the petite flowers, I created a tiered vignette with sweet peas and grape hyacinths in a smaller vase up front.
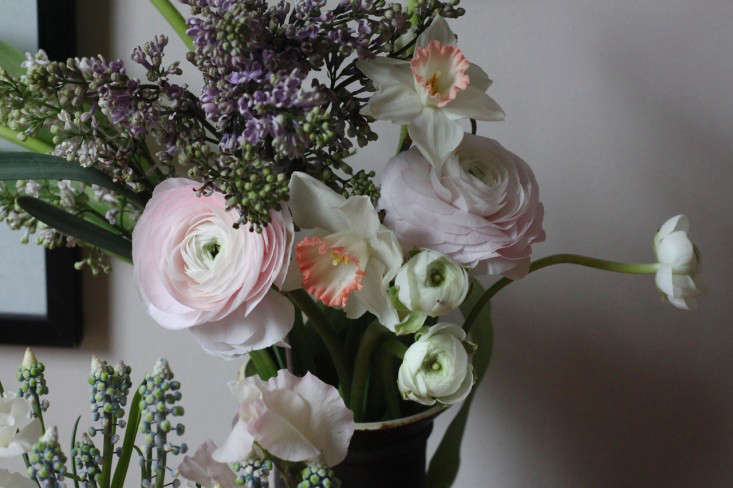
Above: I dubbed this version of my arrangement “Bodacious Spring,” and used pink ranunculus, lavender lilacs, and sherbet frosted narcissus to create a look that was both breezy and lush.
Day 2

Above: Still fresh and opening up a bit.
Because this experiment required me to embrace change, I decided not to (ahem) stem the growth of my tulips by piercing the base of the bloom with a needle. After one day, my swooping tulips gave my previously vertical arrangement a more horizontal aspect. Groovy.
Day 3

Above: Calamity: one of my ranunculus blossoms broke. In addition, one narcissus had already faded and the tulips had run completely amok.
I tried to “fluff up” the taller arrangement by cutting down the tulip stems, but it still looked weak. The old frustration started to creep in.
Then I remembered: “Wait, I’m supposed to be embracing change here, not fighting it.” And so, taking a deep breath, I grabbed a pair of scissors and headed outside to see if my yard had anything to offer. A single just-budding azalea branch later, I was enjoying the second phase of my bouquet, which I called “Victorian Romance.”
Day 5

Above: After the lilacs, narcissus, and sweet peas all wilted, it was finally time to remove them from the arrangement and merge my two bouquets into a smaller arrangement. With this change, I decided to also try a new location. This compact composition seemed more suited for the bedside table than in my lofty hallway. You’ll also note that I saved the broken ranunculus, which looked charming in a small teacup.
Day 7

Above: Eking the last life out of my arrangement, I cut the tulips even shorter. At this point my blooming azaleas added not only structural support, but also a potent shock of color as the buds opened. Interestingly, this was my favorite version of the arrangement, and I never would have discovered it, had I not embraced the evolutionary process.
For some other unruly arrangements that embrace change, see:
- Foraged Ikebana Floral Arrangements.
- 10 Tips for Floral Arrangements With Native Flowers, from Brooklyn Florist Emily Thompson.
Want more fresh florals that keep on giving? Over at Remodelista, Christine explores some Wallpaper for Spring and Meredith reveals our favorite architects’ choices for Paint and Palettes: Schemes for Spring.


Have a Question or Comment About This Post?
Join the conversation