There really is something special about giving a handmade gift. Yes, you have to choose a recipient wisely–someone who will appreciate the effort (while overlooking any flaws)–but when you make the right match, there’s nothing better.
When it’s time to make something special, I sew. (I learned to sew as a young girl, at the side of my grandmother who was a master seamstress. I followed in Grama’s footsteps to Parsons School of Design and now have my own line of Sarah Waldo Organics children’s clothing.)
I think a Roll-up Garden Tool Apron will make the perfect gift for a dear friend who spends her evenings in her plot at our local community garden. So I developed an easy sewing pattern for a tool apron that acts like an extra hand in the garden. It has a pocket for everything and rolls up with everything inside when it’s time to put it away. Mine holds seed packets, notebooks, trowels and clippers.
See below for a materials list and step-by-step instructions:
Photography by Sarah Waldo Jagger for Gardenista.

Materials
- ½ yard Cotton Canvas Duck ($12.98 per yard from Fabric)
- 4 yards 1-inch Cotton Webbing (93 cents per yard at Online Fabric Store)
- Jeans-weight sewing machine needle
- Topstitching Thread to match webbing ($1.48 per spool at Fabric)
- Ruler
- Sewing pins (a packet of Dritz Glasshead Pins is $3.99 from Joann Fabrics)
- Scissors

Step 1: With a hot iron, press your cotton canvas and cut to measure 19.5 inches by 24 inches. Fold the bottom (24 inches wide) edge up 7.25 inches. Press. (Your piece now has the overall dimensions of 24 inches wide by 12.25 inches tall.)
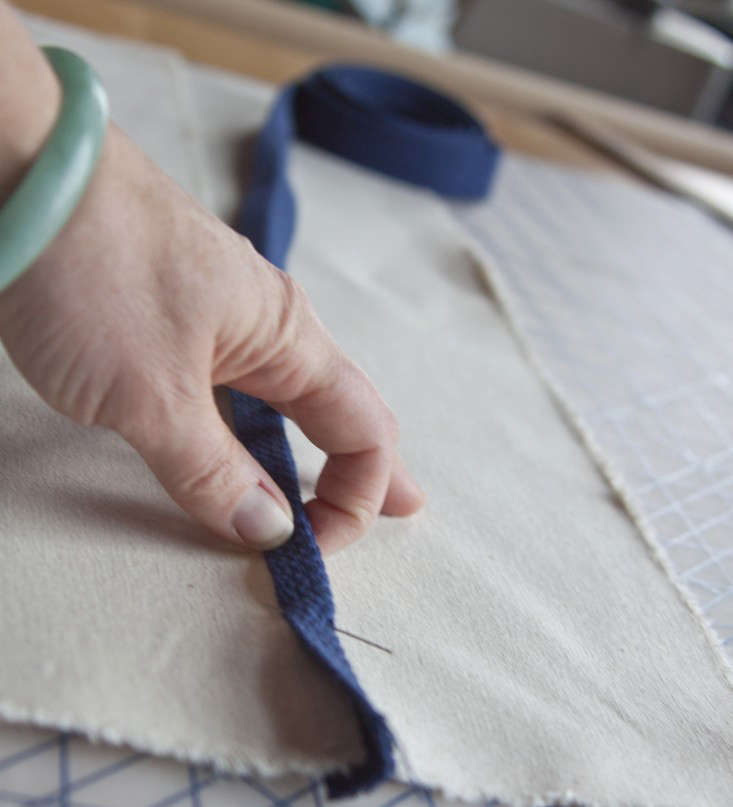
Step 2: Fold the width of the cotton webbing in half and press along the whole length. Take the folded webbing, and sandwich the top edge. Pin the webbing in place along this edge. Topstitch the webbing onto the canvas using a jeans-weight sewing needle and heavyweight thread. Trim the webbing off flush with the sides of the canvas.

Step 3: You are now going to measure and mark for the pockets. For my apron, I marked at 5.5 inches, 9.5 inches, 15.5 inches and 19.5 inches from the left side. At each of these measurements, make a pencil dot at the top, middle and bottom of what will be the pocket. Draw straight lines vertically to connect the dots. Starting at the bottom edge, sew along these pencil marks right to the edge of your cotton webbing trim; this will make the pockets of the apron. Don’t forget to backstitch at the start and stop of your sewing.

Step 4: To make a loop to hold a tool, cut a 6-inch-long piece of webbing. Iron it flat. Turn each edge under ½ inch and press. Pin in place just above the pockets, at least 1 inch in from either side. Sew to tack in place (you can do a simple back and forth zig-zag or sew a rectangle just shy of the ½ inch that was folded under to tack it all down).

Step 5: To finish the sides of the apron, fold ½ inch of the webbing edge into itself and press. Line up this clean edge with the bottom of your apron, and then sandwich one side of the apron and pocket into the webbing. Pin in place and topstitch. Trim webbing off flush with the top edge of the apron.
Step 6: Take the remainder of your cotton webbing (at least 78 inches) and find the center. Make sure your webbing is pressed in half for at least 12 inches on each side of center. Find the center of your apron and starting with the middle of the webbing piece, sandwich the top edge of the apron into the webbing. Work out towards both sides from center, pinning the webbing into place. Topstitch the webbing to the apron body. The webbing will open to 1 inch on either side of the apron for the ties.

Step 7: Fill the pockets with your favorite gardening tools and tidbits.

Above: To roll for gift giving or storage, fold the top bit of the apron down toward the pockets. Starting at one end, roll the apron into itself. Use the ties to wind around the bundle and tie.
Are you making handmade gifts this holiday season? For more inspiration, see:


Have a Question or Comment About This Post?
Join the conversation