Sumac, the sour red spice, is associated almost exclusively with Mediterranean and Middle Eastern food traditions. Yet North America is rich in native sumac species. Making your own sumac powder from local shrubs is a rewarding way to capture both time and place. While every species of Rhus can be used, the last sumac of the year to ripen is winged sumac (also called shiny sumac, for its glossy leaves), Rhus copallinum. Here’s how to identify it, plant it for autumnal beauty, and process its fruit to make the rivetingly sour spice.
Photography by Marie Viljoen.

Winged sumac is so-called because of the narrow green planes that hug the compound leaves’ midribs. They make this species of Rhus easy to identify at a glance.
Sumacs all belong to the genus Rhus, within the larger family Anacardiaceae, which includes commercial crops like cashews, mango, and pistachio. Other cousins are those notorious itchers, poison ivy and poison sumac.

Poison ivy and poison sumac are species of Toxicodendron and appear different from edible sumacs in that they have white (say that out loud: white) fruit. Not orange, not red, not brown: white.

Winged sumac’s amber-brown clusters of drupes are shaded more deeply than some of the more orange and amber species that precede it in ripeness. Staghorn, smooth sumac, fragrant sumac and others can be used to make the sour spice. I favor winged and smooth, because neither has fuzz covering each drupe, making them easier to process.

Its frank and sour nature notwithstanding, winged sumac is worth planting purely as a spectacular autumnal ornamental. After the branches are bare of its colorful foliage, the fruit heads persist (if you haven’t gleaned them all to eat, of course). Birds also eat the drupes when other food is hard to find. Chickadees, nuthatches, warblers, and mockingbirds relish the bounty. Winged sumac is hardy from USDA zones 4 through 9, making it very cold-climate friendly. Plant it in full sun.

Sumacs were one of the first North American plants to be collected and taken to England, planted by gardeners mesmerized by their warm fall colors in a muted autumn landscape unaccustomed to a North American fall’s blaze.

Native Americans have long used these acerbic fruits as a medicine and a flavoring, especially for water. Sumac’s antimicrobial properties might even have been associated with cleansing drinking water (that’s me, thinking out loud, not any record I have been able to find).

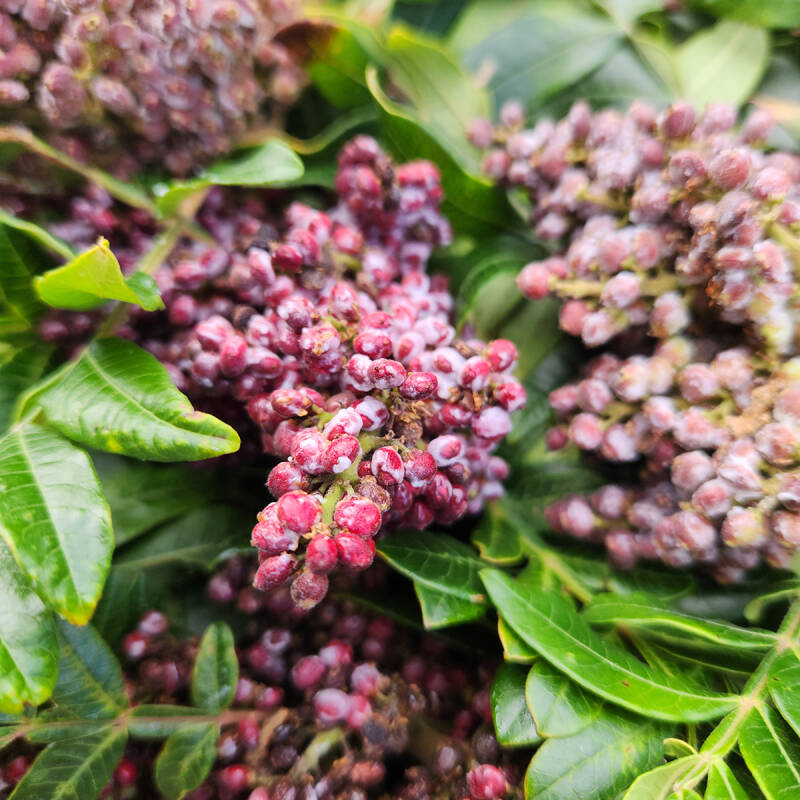
The sour part of sumac is the pericarp, the covering around the hard, tasteless seed. I always check a cluster of fruit (also called a bob) to see if it is sour before gathering it; hard or prolonged rain can rinse the clusters free of flavor, but the oils build up again after a few hours.

The most intensely mouthwatering clusters of sumac ooze a white, frosting-like coating. This is sourness amplified, and utterly delicious. You have struck sumac gold.
To collect sumac for drying, check each cluster for signs of insect frass (poop); you want good, bright clusters, with no dead spots. The bobs are easy to snap off by hands with no damage to the shrub, or you can use pruners. Trim off any extra leaves.


Ground Sumac
(Adapted from the Sumac chapter of Forage, Harvest, Feast—A Wild-Inspired Cuisine.)
For reference, 2½ ounces (about ½ cup) of dried sumac drupes will create 3 tablespoons of ground sumac. Most recipes will call for at least 1 tablespoon.
To dry sumac, you can either leave your clusters whole, or pick off all the fresh, ripe drupes from the clusters. After years of collecting, I now favor the former method: It’s easier, and less precious juice is wasted on your fingers. Either way, spread the fruit out on a parchment-lined surface and leave out at room temperature until dry (from 3 to 7 days, if the humidity is low).
Transfer the dried drupes in batches to a spice grinder and grind for a few seconds. When you notice the pale seeds revealed, test by sifting some through a single-mesh strainer (double mesh is too fine). If the sour pericarp is sifting through, leaving behind the hard flavorless seed, you’re good to go. If it is still too bulky, grind some more. Sift in batches, returning the leftover pieces to the grinder and sifting again.
(If some of the seeds have been chewed up more finely by the grinder and sift through, they won’t hurt you—they’re just tasteless.)
Once the sumac has all been sifted, transfer to small, airtight containers. Keep one for immediate use and freeze any extra.

Buttery Sumac Shortbread Crackers
Makes about 40 crackers
These crackers are of the melt-in-the-mouth variety. Embrace the butter. (They evolved one day from the pastry trimmings left over after making mushroom hand pies.)
- 4 oz plus 3 Tablespoons butter, very cold
- ½ teaspoon salt
- 5 oz all-purpose flour, plus more for dusting the rolling surface
- 3 Tablespoons Half and Half
- 1 Tablespoon ground sumac
- 1 Tablespoons dried mugwort flowers (optional)
Combine the flour and salt in a bowl*. Using the coarse side of box grater, grate the cold butter into the flour (no grater? Cut it into small cubes). Toss some flour into the butter-mound to help prevent clumping, and then work the butter and flour between your fingertips until the mixture resembles evenly coarse sand. Pour in the Half and Half and work with a wooden spoon a few times. Bring the pastry together with your hands, taking care to use as few motions as possible. (All of this can be done in a food processor, too; just don’t overwork it, or the crackers become tough.)
Form the pastry into a fat disc. Wrap it and chill until solid (at least an hour and as long as 24), or freeze for later use.
Preheat the oven to 375’F.
Dust a clean surface with flour and roll out one pastry disc to about 1/8-inch. Sprinkle half the sumac and half the optional mugwort across the surface and pass the rolling over the pastry two more times to press in the seasoning/s.
Using a wheeled pastry cutter or a knife cut the pastry into ribbons about 2 inches wide. Cut across those ribbons to make the short side around 1.5 inches (or go wild and make any size you like!). You can also press out individual crackers, using a cookie cutter, but it’s more time-consuming and creates more trimmings. Transfer the cut crackers to a parchment-lined baking sheet and chill for 10 minutes.
Slide the chilled crackers into the hot oven and bake for about 15 minutes, removing the tray the minute the edges of the crackers turn deep golden. Immediately, sprinkle the remaining sumac and mugwort, if using, over the hot crackers. Cool on wire racks.
See also:
- Ripe and Ready: Rosehips for a Simple Syrup
- Sweet, Tart, Juicy—and Invasive: Autumn Olives Are Ripe for the Picking
- Green Coriander Seed: Meet Your New Favorite Ingredient


Have a Question or Comment About This Post?
Join the conversation