Even if you’re lucky enough to have a designated mudroom, a pair of wet and muddy boots can quickly make the space live up to its name in a not-so-good way. Here’s a solution for the mud-averse: a metal tray filled with beach stones where wet shoes can drain without making a mess. It’s on wheels, so you can roll it out of sight in a small space.
Read on for materials and step-by-step instructions:
Photography by Erin Boyle for Gardenista.

Materials
- 1 metal box (I used a vintage airplane drawer; a similar rectangular Galvanized Steel Tray is $39.50 from Pottery Barn)
- 4 1-1/4-inch Casters; $2.39 each from Home Depot
- 16 Round-Head Machine Screws; $5.60 for a pack of 100 from Home Depot
- 16 Machine Screw Nuts; $1.18 for 12 pieces from Home Depot
- 32 3/8-inch Zinc-Plated Flat Washers; $3.14 for 25 pieces from Home Depot
- Mexican Beach Pebbles; $24.97 for .5 cu. feet from Home Depot
- Drill
- Marker
- Measuring tape
- Scrap piece of 2-by-4 lumber
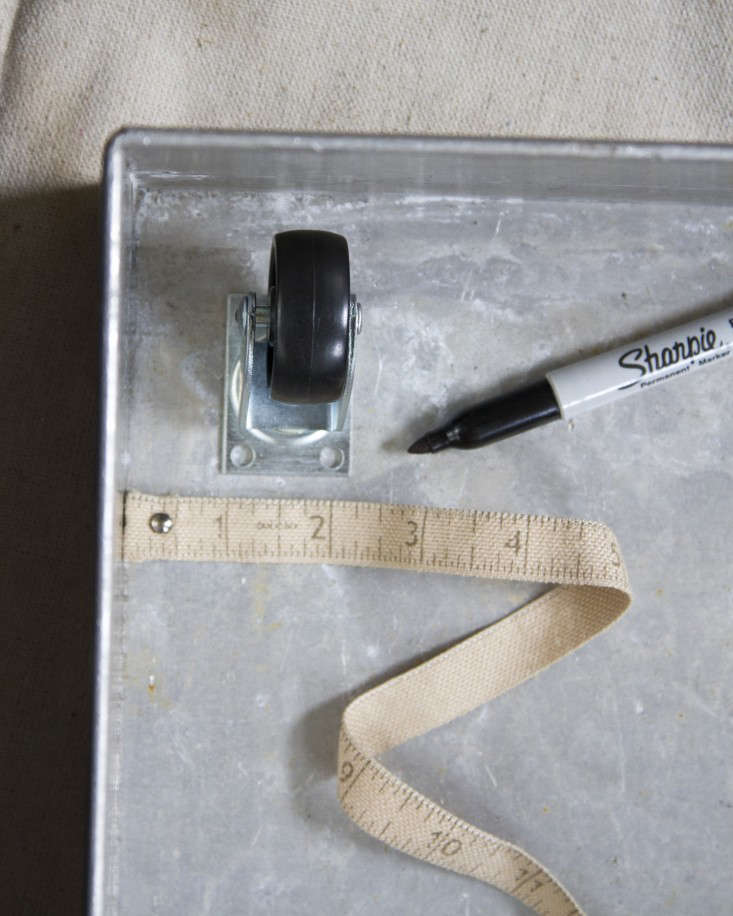
Above: To begin, I marked dots on a metal box to indicate where four casters would sit. (I measured an inch in from the box’s edges so the wheels would stay beneath the tray even when swiveled.)

Above: Next I used a power drill to make holes for the casters. I drilled into a piece of scrap 2-by-4 below my box to avoid damaging the floor. Because the metal of the box was thin, I was able to use a standard drill bit. If you’re using a thicker box, you might opt for a drill specifically designed to be used with metal.

Above: I used round-head machine screws to attach the casters to the box. Placing washers between the screw and the drilled hole prevents the screw head from coming through the hole. The round screw heads should be placed on the inside of the box.

Above: To attach the casters, I attached nuts to the underside of the box. I used washers on this side as well for added stability.

Above: Here’s a close-up shot of how the casters should be attached to the bottom of the box.

Above: Next, I filled the box with a thin layer of smooth beach stones. You can purchase these from your local hardware or landscaping store, or collect them over time on beach adventures. Be mindful that stones can get heavy, so make sure to keep your layer of stones thin enough so that they don’t bend the box.
N.B.: If you don’t want to drill, you can make a simpler, non-rolling version of this boot tray by filling a low-sided jelly roll pan with a layer of rocks. An Uncoated Large Jelly Roll Pan measuring 16 3/4 by 12 inches is $17.18 at Amazon.

Above: Rain boots left to dry on top of the stones. The wheels allow the box to be easily stowed under a bench.

Are you the market for a new pair of garden shoes? See 10 Easy Pieces: Garden Clogs and Ankle Boots. Does your lackluster mudroom need sprucing? Get inspired with Storage: Entryway and Mudroom Roundup on Remodelista.
For more Small Space DIY projects, see:
- DIY: Countertop Herb Garden
- A Tiny Fall Garden in a Window Box
- A Perfect Shoe Rack for a Narrow Entryway


Have a Question or Comment About This Post?
Join the conversation