Icon - Arrow LeftAn icon we use to indicate a rightwards action. Icon - Arrow RightAn icon we use to indicate a leftwards action. Icon - External LinkAn icon we use to indicate a button link is external. Icon - MessageThe icon we use to represent an email action. Icon - Down ChevronUsed to indicate a dropdown. Icon - CloseUsed to indicate a close action. Icon - Dropdown ArrowUsed to indicate a dropdown. Icon - Location PinUsed to showcase a location on a map. Icon - Zoom OutUsed to indicate a zoom out action on a map. Icon - Zoom InUsed to indicate a zoom in action on a map. Icon - SearchUsed to indicate a search action. Icon - EmailUsed to indicate an emai action. Icon - FacebookFacebooks brand mark for use in social sharing icons. flipboard Icon - InstagramInstagrams brand mark for use in social sharing icons. Icon - PinterestPinterests brand mark for use in social sharing icons. Icon - TwitterTwitters brand mark for use in social sharing icons. Icon - Check MarkA check mark for checkbox buttons.
You are reading

Olive Branches: Rethinking an Underappreciated Symbol of Peace

Search

Olive Branches: Rethinking an Underappreciated Symbol of Peace

January 5, 2018

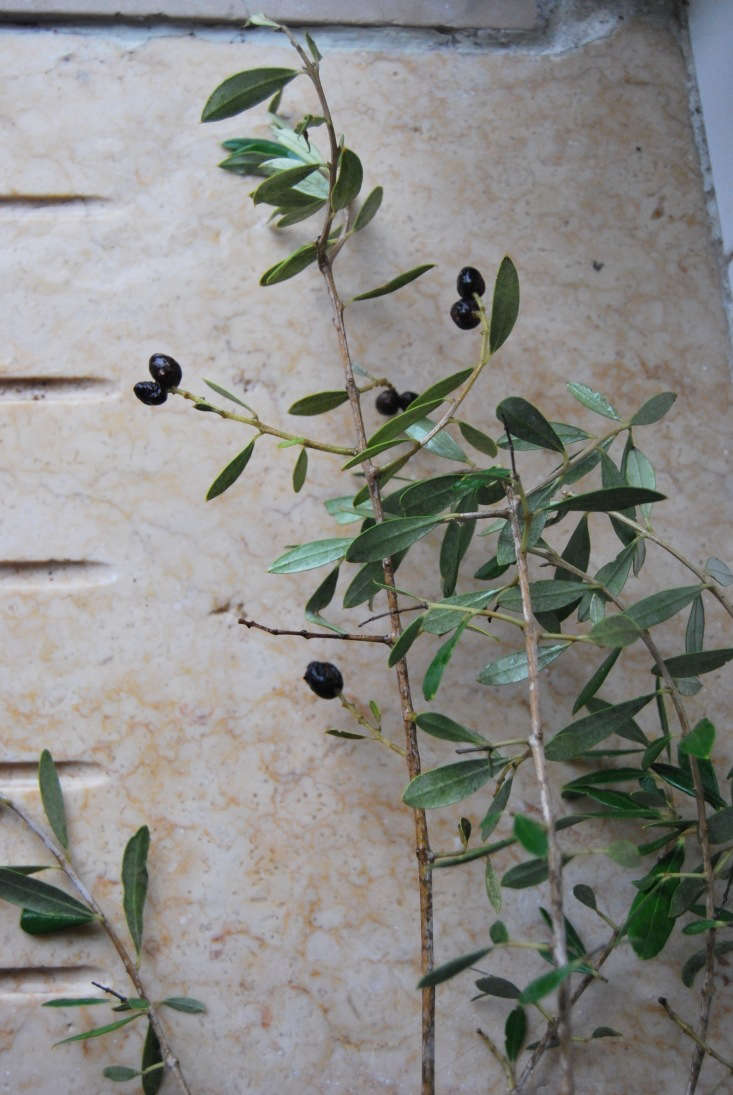
Olive trees are common in Mediterranean climates where olives and their oil are a mainstay of the cuisine. But the leaves and branches have also been used throughout history for different purposes. The ancient Greeks wove the leaves into crowns for Olympic prizes and the branches and oil were used in religious rituals and offerings.

In modern-day flower arranging olive branches are often added as a filler, for a simple wreath, or thrown in a bud vase for a casual centerpiece. But what if the olive branches were the show for a modern, artful arrangement? Olive greens will last for weeks in water. They are woody stems so you can crush them or slice the stem upwards to assist with their intake of water. Added with dried materials, an arrangement like this might stay fresh up to a month in your home.

Read on for step-by-step instructions to recreate a floral arrangement with olive branches:

Photography and styling by Chelsea Fuss.

Step 1: Gather Materials

 Above: I foraged these olive branches from a meadow near my home in Lisbon, Portugal. I always start with more than I need. After bringing them home to rinse, I re-cut the stems and let them soak in water. I paired them with a stem of mimosa and some dried meadow grasses.
Above: Above: I foraged these olive branches from a meadow near my home in Lisbon, Portugal. I always start with more than I need. After bringing them home to rinse, I re-cut the stems and let them soak in water. I paired them with a stem of mimosa and some dried meadow grasses.

I wanted to play with the silvery green of the leaves by adding lighter dried materials to contrast and provide texture. I added mimosa stems (which have not yet opened) and flowers that offer a hint of pastel yellow.

 When foraging for olive greens, I look for curvy, but attractive branches that will be tall enough to create a spacious arrangement.
Above: When foraging for olive greens, I look for curvy, but attractive branches that will be tall enough to create a spacious arrangement.
 I also look for branches with fruit to add color to the selection of greens and dried materials.
Above: I also look for branches with fruit to add color to the selection of greens and dried materials.

Step 2: Choose a Vase and Base

 I chose a small vase ( a rustic ceramic mug) for the tall branches. To weigh them down and keep them in place,  garden stones will keep everything secure.
Above: I chose a small vase ( a rustic ceramic mug) for the tall branches. To weigh them down and keep them in place,  garden stones will keep everything secure.

Using small stones as weights is a perfect trick when you want to play with proportions and use a natural method to secure stems. It’s also more attractive than foam or wire, and blends in seamlessly with the composition.

Step 3: Create a Shape

 Above: I started with the olive branches to create a shape I liked, turning them different directions so that you see different colors of leaves from the shiny top to the more grey underside.
Above: Above: I started with the olive branches to create a shape I liked, turning them different directions so that you see different colors of leaves from the shiny top to the more grey underside.

First I created an asymmetrical shape with two small olive branches with fruit and a taller, more curvy branch.

Step 4: Add Dried Materials

 Next I added in dried meadow grasses for drama and to add another contrasting color.
Above: Next I added in dried meadow grasses for drama and to add another contrasting color.

Next, I added dried ingredients and the stem of mimosa, leaving plenty of negative space to appreciate the curves of the leaves and textures of the dried materials.

Step 5: Add Texture

 I added a small, more dense branch of mimosa toward the bottom of the vase for additional texture and to fill in.
Above: I added a small, more dense branch of mimosa toward the bottom of the vase for additional texture and to fill in.

I like both sides of the olive leaves. One side is a brighter green, the other a silvery gray. I make sure both sides of the leaves are seen from each side of the arrangement, to add interest and depth.

The Floral Arrangement

 This arrangement deserves lots of space to properly display the drama. It&#8\2\17;s perfect for a large farm table centerpiece or sideboard.
Above: This arrangement deserves lots of space to properly display the drama. It’s perfect for a large farm table centerpiece or sideboard.

N.B.: Olive trees also add silvery depth to a landscape (or, if they are small, in planters). See some of our favorite examples:

(Visited 1,464 times, 11 visits today)
You need to login or register to view and manage your bookmarks.

Have a Question or Comment About This Post?

Join the conversation

v5.0