Whenever I catch a whiff of citronella, I’m taken back to family camping trips. We had an oily bug repellent in a sticky brown bottle that we’d pass around–usually well after we’d suffered our first bites–and we’d slather it on until our skin shone. While the citronella oil in the bottle did keep the mosquitoes away, it was repellent to us humans as well.
As an adult, I’m still interested in keeping mosquitoes away (see my post-bite efforts in Stop the Itch: Natural Mosquito Bite Remedies) but less keen on slathering my skin with something that smelly. Instead, I like to take a tip from Michelle and surround myself with candles, which sets a mood and keeps the bugs away.
Most insect-repellent candles on the market are filled with DEET or other toxins and reek of citronella. So I decided to make my own scented tea lights that would keep pests at bay without also sending dinner guests running. I settled on a woodsy combination of rosemary, geranium, and lavender oils–three scents known for repelling mosquitoes and other insects.
Read on for a materials list and step-by-step instructions:
Photography by Erin Boyle for Gardenista.

Materials
- ½ pound beeswax (1 lb Raw Settled Beeswax is $6 from Brushy Mountain Bee Farm)
- Rosemary Essential Oil; $8.29 for .25 fluid ounces from Aura Cacia
- Geranium Essential Oil; $20.79 for .25 fluid ounces from Aura Cacia
- Lavender Essential Oil; $14.65 for .25 fluid ounces from Aura Cacia
- Double boiler (or use a pan and a metal bowl)
- 6 Fluted Dessert Cups; $1.99 each at N.Y. Cake
- Pre-Assembled Tea Light Wicks; 100 for $5.95 from Dadant

Above: Use an old knife to break half a pound of beeswax into small pieces that will melt evenly. Fill the bottom pan of your double boiler with water and place the wax into the top pan. Heat until the wax melts. If you’re a stickler for details, use a thermometer; the wax is ready when it reaches about 160 degrees Fahrenheit. A 12-inch Wax and Honey Thermometer is $14.50 from Brushy Mountain Bee Farm.

Above: Add several drops of each essential oil to the melted wax. I used a wooden chopstick to stir in rosemary, geranium, and lavender oils. Beeswax has a distinctive smell, so add an extra drop or two more than you think you need, to make sure your candles are scented enough to repel insects. (If you prefer citronella or other essential oils known for repelling insects, swap in any of these to suit your taste.)
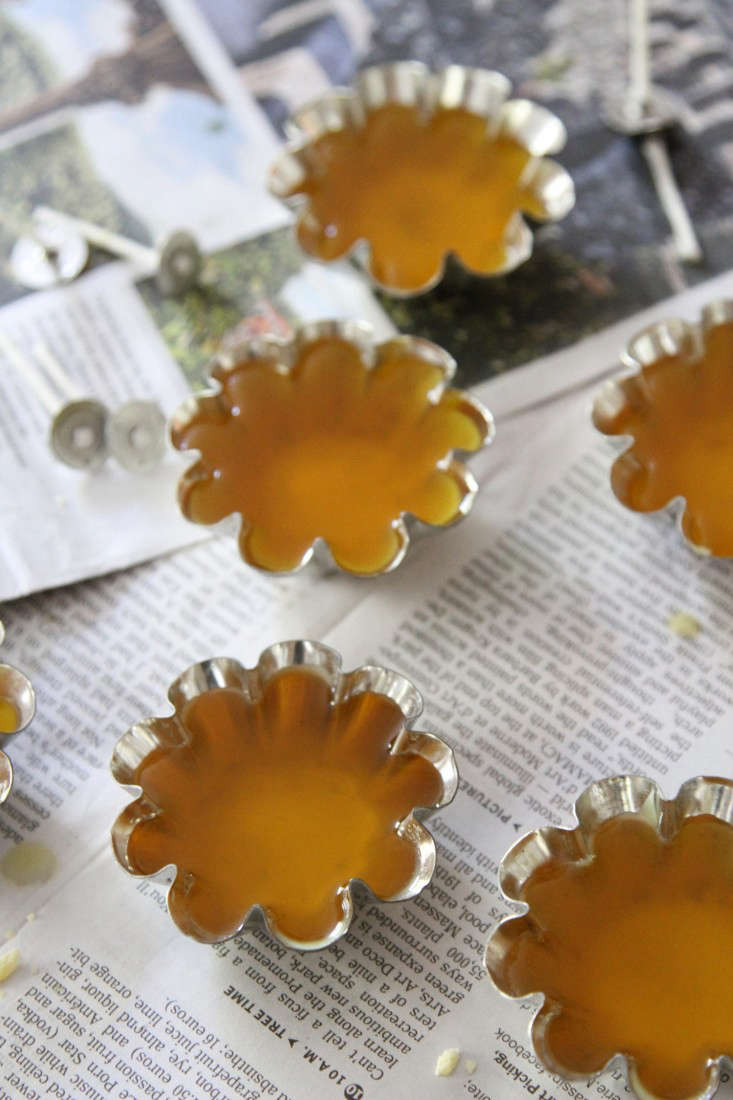
Above: Pour the scented wax into the tart tins. (If the pan you’re using doesn’t have a pour spout, consider putting the hot wax into a glass measuring cup or other spouted vessel to help with pouring.) I filled each tin until almost full. N.B.: If you don’t have aluminum molds, you can use glass instead. To avoid shattering the glass, start with a small amount of wax and let it cool a bit before pouring in the rest.

Above: Let the wax cool slightly until a skin starts to form. Then place a pre-assembled tea-light wick (see below) in the center of each mold. The wax will smooth out around the wick as it hardens.
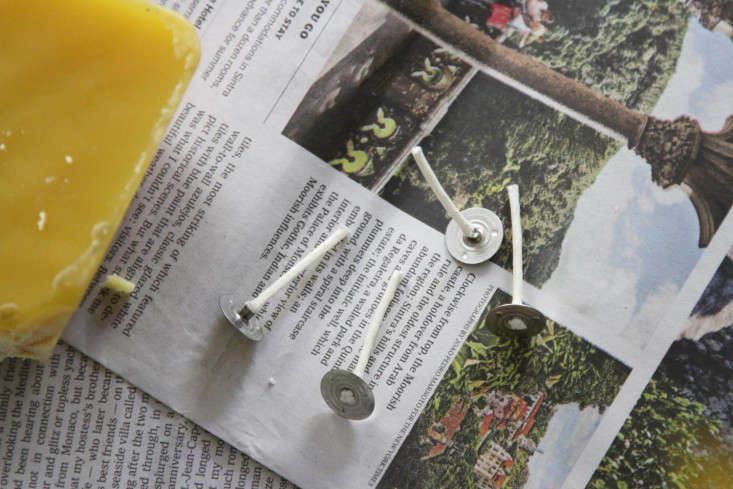
Above: Pre-assembled wicks come already primed, i.e. coated in wax. If yours aren’t coated, you’ll need to prime them yourself by dipping them in wax. This ensures a longer burn time.

Above: Let the wax harden, then trim the wick to a height of 1/4 inch. Use your tea lights during your next outdoor cocktail hour or dinner party under the stars.

Above: Each tea light will burn for four to six hours.
Speaking of dinner parties sous les étoiles, see Steal This Look: The Last Outdoor Dinner of the Season and A Starlit Greenhouse Dinner. Then get on with hosting one of your own.


Have a Question or Comment About This Post?
Join the conversation