Icon - Arrow LeftAn icon we use to indicate a rightwards action. Icon - Arrow RightAn icon we use to indicate a leftwards action. Icon - External LinkAn icon we use to indicate a button link is external. Icon - MessageThe icon we use to represent an email action. Icon - Down ChevronUsed to indicate a dropdown. Icon - CloseUsed to indicate a close action. Icon - Dropdown ArrowUsed to indicate a dropdown. Icon - Location PinUsed to showcase a location on a map. Icon - Zoom OutUsed to indicate a zoom out action on a map. Icon - Zoom InUsed to indicate a zoom in action on a map. Icon - SearchUsed to indicate a search action. Icon - EmailUsed to indicate an emai action. Icon - FacebookFacebooks brand mark for use in social sharing icons. flipboard Icon - InstagramInstagrams brand mark for use in social sharing icons. Icon - PinterestPinterests brand mark for use in social sharing icons. Icon - TwitterTwitters brand mark for use in social sharing icons. Icon - Check MarkA check mark for checkbox buttons.
You are reading

DIY: Painted House Numbers

Search

DIY: Painted House Numbers

June 9, 2016

House numbers have their own personality–and say something about yours. When we saw this easy DIY painted house numbers project by Jones Design, we immediately started dreaming about fonts. (If you get sick of a typeface, you can just paint over it.)

For step-by-step instructions, see Jones Design.

Photography courtesy of Jones Design.

DIY-materials-painted-house-nubers-gardenista

Above: You probably have most of the materials on hand. See a list of supplies at Jones Design. You’ll also need house numbers in a typeface you like (or use Jones Design’s template).

diy-painted-house-numbers-chalk-gardenistaAbove: First use chalk to make a transfer.

DIY-painted-house-numbers-DIY-trace-gardenista

Above: Tape the chalked numbers to the door.

DIY-painted-house-numbers-DIY-pencil-gardenista

Above: Trace the numbers. When you lift away the paper, you’ll see faint chalk outlines to guide you as you paint.

DIY-painted-house-numbers-DIY-black-white-gardenista

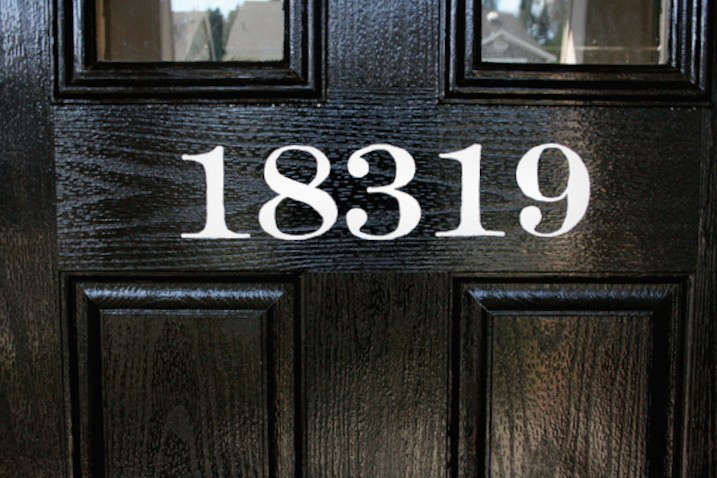
Above: Use a thin paint brush, take your time, and apply as many coats as you need. For complete instructions, see Jones Design.

For more, see:

(Visited 817 times, 1 visits today)
You need to login or register to view and manage your bookmarks.

Have a Question or Comment About This Post?

Join the conversation

v5.0