Icon - Arrow LeftAn icon we use to indicate a rightwards action. Icon - Arrow RightAn icon we use to indicate a leftwards action. Icon - External LinkAn icon we use to indicate a button link is external. Icon - MessageThe icon we use to represent an email action. Icon - Down ChevronUsed to indicate a dropdown. Icon - CloseUsed to indicate a close action. Icon - Dropdown ArrowUsed to indicate a dropdown. Icon - Location PinUsed to showcase a location on a map. Icon - Zoom OutUsed to indicate a zoom out action on a map. Icon - Zoom InUsed to indicate a zoom in action on a map. Icon - SearchUsed to indicate a search action. Icon - EmailUsed to indicate an emai action. Icon - FacebookFacebooks brand mark for use in social sharing icons. flipboard Icon - InstagramInstagrams brand mark for use in social sharing icons. Icon - PinterestPinterests brand mark for use in social sharing icons. Icon - TwitterTwitters brand mark for use in social sharing icons. Icon - Check MarkA check mark for checkbox buttons.
You are reading

DIY: Homemade Holiday Boughs

Search

DIY: Homemade Holiday Boughs

December 18, 2017

Most of the time, my dining room doubles as a photography studio. But this weekend, I’m actually having a dinner party. With all the cooking I have to do, I won’t want to spend too much time on decorations. Still, one does not want to be a Bah Humbug. Time for some last-minute holiday decor.

Here are step-by-step instructions to create a festive mood with homemade holiday boughs

Step 1: Gather Evergreens

A quick trip outdoors provided the base for a still life with holiday boughs, with foraged juniper evergreens. At the grocery store, I found seeded eucalyptus as well as white Hypericum berries. For a bit of the exotic, I choose Brasilia from my local florist.
Above: A quick trip outdoors provided the base for a still life with holiday boughs, with foraged juniper evergreens. At the grocery store, I found seeded eucalyptus as well as white Hypericum berries. For a bit of the exotic, I choose Brasilia from my local florist.

Choose a theme first. Whether it’s traditional red and green or Scandi-minimal, a theme will create a cohesive feeling. I wanted a simple theme of winter woodland, so I chose a mix of evergreens and snow-like berries. Pine cones and paperwhite bulbs provided a bit of texture and warm brown tones. Note that if, like me, you choose to use greens, make sure that even without water, they will maintain their shape and color throughout the holiday season.

Here is my plant materials list:

  • Juniper branches
  • Seeded eucalyptus
  • White Hypericum berries
  • Brasilia
  • Paperwhite narcissus bulbs
  • Pine cones

Step 2: Frame the Composition

A vintage gilded frame added visual structure to my arrangement. Providing a bit of holiday bling, its golden color is also the perfect complement for the dark green foliage. Additionally, a blank frame provided physical support for my arrangement. You may also note that I hung the frame a bit off center. To my eye, asymmetry creates a more dynamic composition.
Above: A vintage gilded frame added visual structure to my arrangement. Providing a bit of holiday bling, its golden color is also the perfect complement for the dark green foliage. Additionally, a blank frame provided physical support for my arrangement. You may also note that I hung the frame a bit off center. To my eye, asymmetry creates a more dynamic composition.

Hang a frame to anchor your design. It could be a simple wreath or a mirror, even a bare branch, anything that will provide a focal point around which to build your composition.

Step 3: Arrange the Bigger Materials

I started with a large branch of juniper, which I simply stuck into the frame. From there I began to build, adding a pine cone and berries until I had the basis of the composition.
Above: I started with a large branch of juniper, which I simply stuck into the frame. From there I began to build, adding a pine cone and berries until I had the basis of the composition.

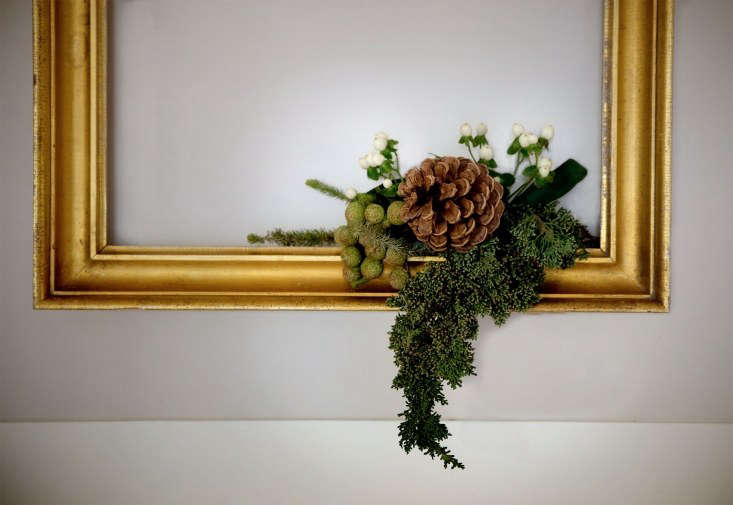
Starting with a largest pieces, build up your arrangement. Be flexible and experiment. Move things around until it feels right. Then add the next piece and so on.

Step 4: Add Vertical Element(s)

For my vertical element, I added a piece of velvet ribbon, which I informally draped inside and out of the frame. Further details within the greens also enhanced the send of height.
Above: For my vertical element, I added a piece of velvet ribbon, which I informally draped inside and out of the frame. Further details within the greens also enhanced the send of height.

A successful vignette contains both vertical and horizontal elements, which together create a sense of dynamism as they guide your eye around the arrangement. If your boughs are above a mantelpiece, candlesticks are always a good choice as a vertical element.

Place the longest or highest pieces towards the outside of your composition, placing elements that are shorter towards the center. This placement will keep the eye within the arrangement.

Step 5: Create a Horizontal Counter Balance

As a counterpoint to the strong vertical of my frame, I simply added two bulbs and a few Brasilia berries to a shelf below the boughs.
Above: As a counterpoint to the strong vertical of my frame, I simply added two bulbs and a few Brasilia berries to a shelf below the boughs.

To balance your composition, add horizontal element(s). Books laid on their side or some low-lying votives are good choices. A draping garland is also a natural choice for the holidays.

Step 6: Add Lights

To complete the composition, I draped a simple string of fairy lights on the shelf.
Above: To complete the composition, I draped a simple string of fairy lights on the shelf.

Normally lights might be optional, but not during the holidays. If you’re opposed to electric, try candles.

The Final Festive Look

Ready for guests, my homemade holiday boughs glow and add cheer.
Above: Ready for guests, my homemade holiday boughs glow and add cheer.

Looking for more easy, holiday decor that won’t break the budget? Try my mantel arrangement: DIY: Minimalist Holiday Mantel, $10 Edition. Or:

(Visited 204 times, 1 visits today)
You need to login or register to view and manage your bookmarks.

Have a Question or Comment About This Post?

Join the conversation

v5.0