Find yourself doubting the utility of a pile of rusty nails and fallen walnuts? Think again.
Liane Tyrrel began experimenting with homespun dyeing in 2010. Her initial motivation was a desire to make shades of gray and black using plant-based dyes.
With a background in painting, Liane realized that the same impulses she had to create a varied surface on canvas translated to an interest in fabrics that have “depth and variation in color and mark.” Although some vintage textiles naturally displayed those characteristics from age and wear, she found herself limited both in color and her ability to track down and afford exactly what she was after.
So Liane taught herself to dye fabrics with the aid of her collection of vintage dye books and a bit of newer-fangled Internet research.
See below for her step-by-step instructions on making a natural dye from black walnuts you can use to dye a set of napkins:
Photographs by Liane Tyrrel.

Above: A tabletop decorated with Liane’s hand-dyed fabrics, which she sells through her Etsy shop Enhabiten.
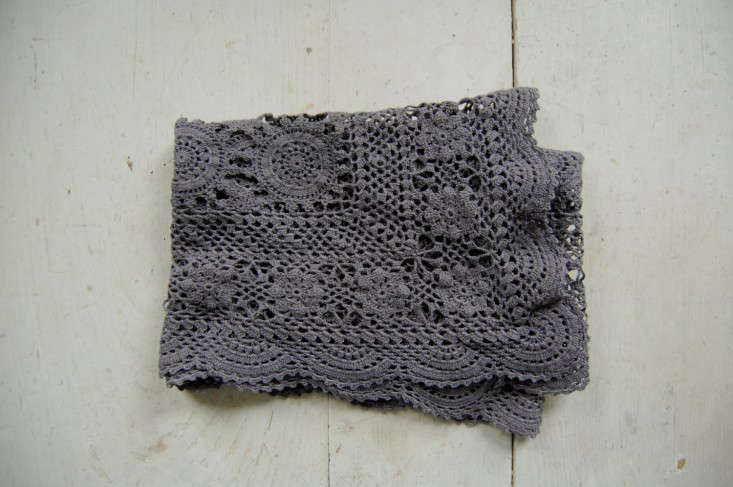
Above: A 37-inch-long Hand-Dyed Vintage Table Runner, a textile Liane dyed a rich gray through natural processes, is $35 from Enhabiten on Etsy.

Above: Sumac leaves, rusty water, and black walnuts, hulls still attached.
Liane uses a combination of found, foraged, and purchased natural materials for dyeing, but she’s particularly interested in dyeing with material she can find and forage herself locally. At this time of year, a few of these materials include rusty iron nails, sumac leaves, and black walnuts.
Sumac leaves are high in tannic acid, which makes them a good mordant (meaning they help other colors have more permanence). Liane explains that in the summertime the leaves have the highest tannin content and turn natural fiber materials yellow. In the fall, the red leaves produce a tan color. Old rusty metal, soaked in water for a least two weeks, makes an orange brown liquid rich in iron. To create shades of gray, Liane soaks her material in a sumac dye pot first, rinses, and then soaks the material in the iron liquid.

Above: Recently, Liane has been harvesting black walnuts from a tree she found down the road from her house. The nut hulls give shades of tan and brown and in the Northeast United States where Liane lives, she can still find black walnuts fallen to the ground.

Above: Liane used a tie-dye technique with black walnuts to dye vintage napkins for a late-October table setting. Liane explains, “With this technique and materials, I get an organic and subtle color and pattern that I love.”
Here’s how:

Black Walnut Tie-Dye Napkins
Collect a dozen or so walnuts and crack the soft hulls open with a rock. Wear rubber gloves to prevent the brown dye from getting on your hands and wear an apron to protect your clothes.
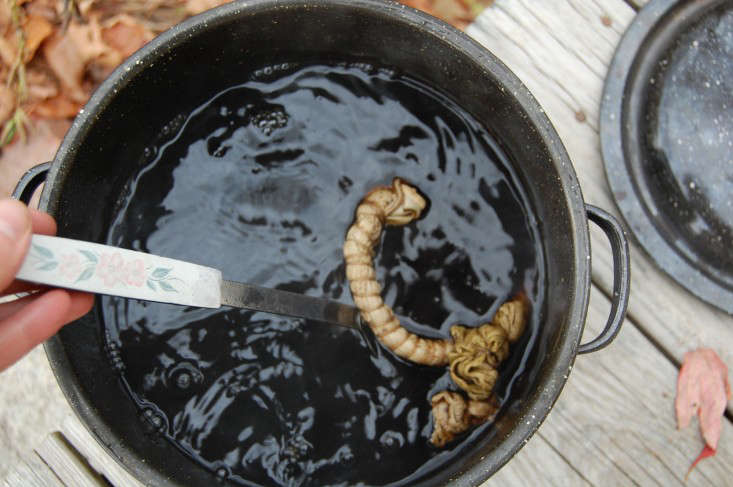
Fill a large pot with water and add the cracked hulls. Use an old pot which can be used exclusively for dyeing and keep it separate from your cooking pots. Heat the pot to boil and simmer for 20 minutes, or so. Then turn the heat off and filter out the hulls.

Above: Meanwhile, wrap your napkins tightly with string as shown.

Above: When the dye is ready, submerge the tied napkins in the pot. Swish them around a bit and let them soak for about 10 minutes.
Above: Scoop out the napkins and let them cool for several minutes.

Above: After the napkins have cooled, you can untie them and hang them to dry.

Above: After the napkins have dried, wash them in cool water, dry, and iron.
More on natural dyes right here: Back to Nature: Plant Dyes from Permacouture and DIY: Make a Natural Fabric Dye with Wisteria.


Have a Question or Comment About This Post?
Join the conversation