For me, one of the highlights at Coton Manor Garden in Northamptonshire has always been the sturdy willow and hazel supports around the roses. If I had a country estate, I’d have the same–instead of buying readymade versions that too often seem to have been built to fit into the back of a car rather than the garden. The other day I went to Coton to spend a morning with Richard Green, head gardener of 34 years, to learn to make my own:
Photographs by Kendra Wilson for Gardenista.

Making your own supports in situ is perfectly possible, and they will be tailored to the individual requirements of your roses or clematis or clump of asters. You don’t need a team of gardeners; just an ax, a mallet, and the ability to form a circle.

Gather your materials. In the UK, a burgeoning interest in willow weaving and homemade structures has led to a wider availability of Willow and hazel both on the Internet and at garden centers. However: there are no hard and fast rules about materials. Posts can be made from anything that is roughly “broom handle size.”
Hazel, ash and blackthorn are available in the fields around Coton so that is why they are chosen. US readers could just as easily use hickory or sycamore. It’s always worth inquiring when people are cutting back in parks and gardens; there is bound to be some wood which is thick enough and more or less straight. This applies also to the bendable material which will be made into circles.
(If DIY seems beyond you, there are sturdy and attractive alternatives you can buy: see Design Sleuth: Willow Accessories for the Garden.)
Willow in the hedgerow will grow up to ten feet in one year: perfect for twisting into plant supports. However, and this is really good news: anything that is collected now or during dormant seasons can be used. You may find yourself cutting back for spring, and your excess can be made use of. Apple from last year’s growth; dog wood, ditto (and to promote colorful new wood for next winter); wisteria; weeping willow, for fastenings. If you are more organized, you may have done all this cutting back earlier, in which case keep your clippings in a cool dark place so that they remain bend-y and do not dry out.

An ax and a sure hand are needed in chipping the bottom of the post into a point to push in the ground. Use a mallet to pound them in. An odd number of posts is more natural but the shape you make with your posts really depends on what you will be growing through your finished support.
Place two of your longest bend-y rods next to each other, pointing them in opposite directions, and tie at one end with twine. One thin end should be nestled in with one thick end.

Twist them around each other, trying to keep this tight and tie at the other end. Make a circle shape and hold this inside your framework (starting with the lower circle) to see what kind of size you need. Tie the circle with string in two places along the overlap so it is nice and strong, Turn it and bend it round into a good circular shape but do not fear: none of this has to be perfect.
For thickening and strengthening the circle use smaller rods. Sharpen the thicker end with a knife or with secateurs and push it in to the circle and twist it round, adding another when this is near its (thin) end, which you need to tuck in (it won’t unravel). Keep adding more rods until the circle is the kind of thickness you are after. Rose supports can last for a few years and with their vigorous growth it is worth making a really sturdy circle. You might want to make something more ethereal for tall herbaceous plants: it is really up to you how it looks.

Using different plant material for twisting can lead to some wonderful color combinations, though it will fade after about six weeks.
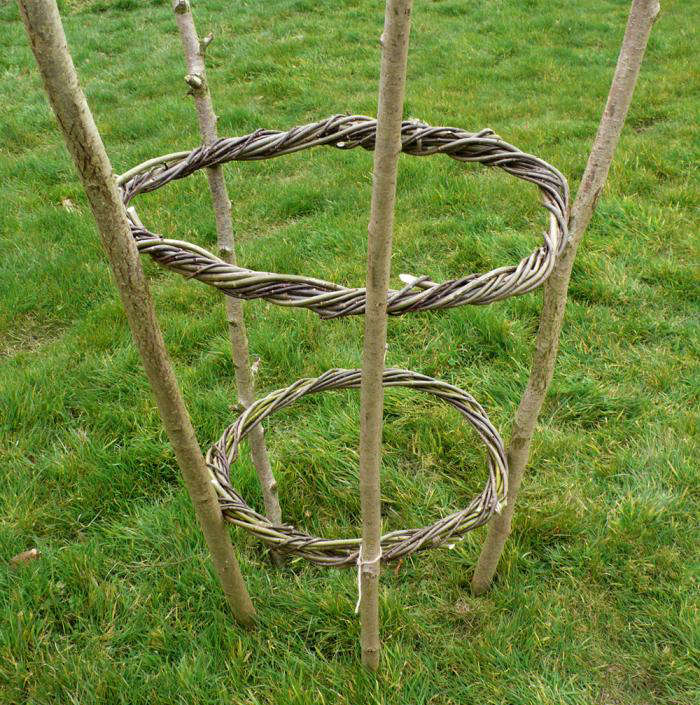
The shape of the structure is something to consider: shrub roses benefit from a vase shape; a taller, semi-climbing rose might do better with a more traditional shape for plant supports: the wigwam, with the side shoots wound around the outside during the growing season. For clematis and lower-growing perennials a cylinder shape is most useful. Tie the hoops on to the posts with twine to keep them in place.

With the ends of the rods which you may have cut off in making your circles, or with thinner material (for instance weeping willow) bind the joints tightly, tucking in the ends. If you want to create a mesh in the middle for herbaceous plants to grow through, sharpen some more rods and push them into the hoops and across to the other side. It will be stronger if you weave over and under as you go (see above).
It is more practical if a wigwam does not come to a peak at the top, for the sake of the flowers, and this is never taken into consideration with shop-bought teepees.

The structures shown here only add to the anticipation: herbaceous clematis at Coton Manor in May.
More woven garden structures, please? See Design Sleuth: Willow Accessories for the Cottage Garden.


Have a Question or Comment About This Post?
Join the conversation