
The day we finally moved into our remodeled house–after the city inspector had tromped through with a picky checklist and the contractors had hauled away their debris mountain and the plumber had been called back twice to coax the hot water heater to produce hot water–was one of the happiest I remember. I would put it right up there with the morning I got married and the day after, when I woke up in Italy and realized it was no longer my problem that we had run low on quiche at the wedding.
The house was so perfect, with its glossy dark floors and marble countertops and sparkly glass doorknobs, that it felt like we were moving into a life-sized dollhouse. Even the last carpenter, who was still screwing in kitchen knobs as the movers unfurled a paper floor runner, was impressed. “This place turned out a lot better than I expected it to three months ago,” he said.
The beauty of a remodel is you get to re-imagine your house. It’s your chance to right all the wrongs and make it perfect. But after you move into the perfect house, you may start noticing–little by little–that new things are wrong. Little things. Picky problems that could have been avoided if only you’d paid a tiny bit more attention during the actual remodel.
Within months, I have a list of things I’d like to change. Not a long list, mind you, or an urgent list, because my house is pretty wonderful. But the items on the list bug me for the simple reason that they exist. There should not be a list. Sometimes I sit outdoors on my beautiful new bluestone terrace, for instance, and I start to get irritated because there’s no flower bed between the bluestone and the house. The pavers run right up to the wall. It looks stark. I think to myself, what idiot designed this? And the answer is me.
Shouldn’t I have gotten everything right the first time? Maybe that’s asking too much. But I made certain mistakes that were avoidable, and I’m sharing them here in case you’re about to embark on–or are in the middle of–your own remodel. Here are ten ways to avoid feeling, after a few months, as if your redo needs a redo:
Do you have a remodeling tip people should know? If so, please add it to the comments section below.
Photographs by Michelle Slatalla except where noted.
1. Do not install a marble backsplash behind your stove.
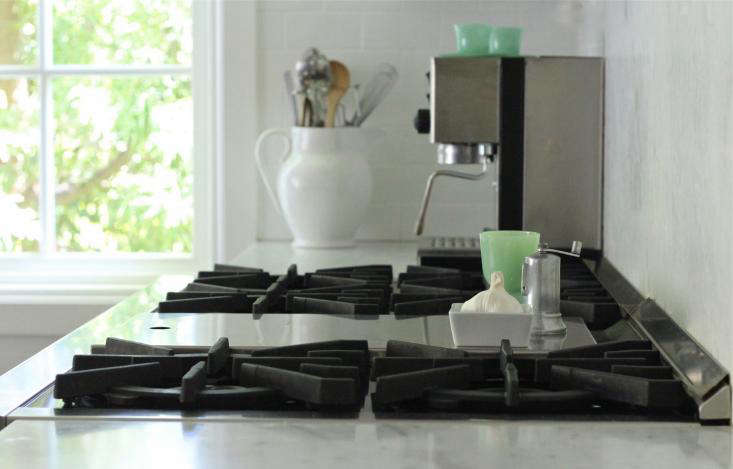
Yes, a marble slab is the most beautiful surface in the world. Yes, the sunlight glints on mine and makes me happy every time I look at it. Yes, I sometimes press my hand against it for the pure pleasure of feeling the cool smoothness. But.
Marble is a very porous surface–perhaps Swiss cheese has more holes, but I wouldn’t swear to it–and I am constantly worrying about grease stains. (For the complete story of the nasty nicotine-yellow plume that suddenly appeared on it one morning, see My Dirty Secret: How to Clean a Marble Backsplash.)
We have sealed it. And sealed it. And sealed it. We have poulticed off stains. And poulticed off more stains. And poulticed off even more stains. And now I am at the point where, if I am considering slathering a chicken in butter and roasting it at 425 degrees, I first do a mental calculation: is it worth the risk to the marble backsplash? This is not how you want to decide what to eat for dinner. Nor do you want to resort to taping up a sheet of tinfoil behind the stove–who am I, my grandmother? Am I going to start calling margarine “oleo” next?–every time you cook.
We originally had planned to tile the backsplash, which by the way would have looked fine.
2. Don’t skimp on the appliances. 
Above: Photograph by Mimi Giboin.
After my husband and I did our appliance research, we concluded that it would cost too much money to spring for a Sub Zero refrigerator. We agreed that the Sub Zero was the best looking refrigerator and that it was built like a tank and that if we had all the money in the world, we’d get one. But we didn’t have all the money in the world.
So even though many friends who had remodeled swore by their Sub Zeros–Julie has one, and my friend Joan has one, and even my friend Rahel (a woman so thrifty that she doesn’t bristle at being described as “cheap”) has one–my husband and I got a built in Kitchen Aid with an ice dispenser (for my husband, who loves gadgets and the idea that you can just walk up to the thing and press a glass against a pad and get ice).
And guess what? This is the only appliance that has given us trouble. Twice we’ve had a repairman to the house to fix the refrigerator. The ice dispenser doesn’t work properly; the ice freezes up in the chute, and then the motor or the condenser burns out and the whole front of the thing has to be removed to expose a gaping cavity of wires and darkness while the repairman tries to figure it out. And then parts have to be ordered.
Is this problem going to recur every few months for the life of the refrigerator? Or will we just give up on the ice dispenser thing–as so many people do–and pretend that it doesn’t exist?
3. Pay attention to hardware details.
I was living in New York while my house was being renovated in California, so when my friend Stephanie (who is a designer) called me from the window showroom to say she didn’t think I was going to like the crank that came with a particular casement window that was going to be installed above the kitchen sink, I said, “Hmmm. Doesn’t sound like a big deal.” I wasn’t really listening because I was typing a blog post or something.
Now I stand in front of that casement window every day, doing dishes, and I hate the crank. It is a brown plastic-y thing that’s practically at eye level. It’s so ugly that every time I take a photo of the otherwise beautiful sink wall–white tile, gooseneck faucet, green view through a casement window–I Photoshop out the crank.
Maybe the crank could be replaced? Who knows? It looks like a sort of complicated crank thing. Who has time to look up the model number of the window and then call the window company to ask about it? And if the window company says “No. No replacement for you!” then who has time to find a non-standard replacement part that would probably violate the warranty but at least not be ugly plastic-y brown?
No. 4: Make sure the bathrooms have natural light.

Sometimes the layout of your house dictates an “internal’ bathroom, surrounded on all sides by other rooms instead of by an exterior wall. This is the case at my house. In that case, install a skylight.
No. 5: Leave space for planting beds around the perimeter of a patio.

We have a bluestone patio that sits flush against the house on two sides. A better solution would have been to leave a 2- or 3-foot gap between the wall of the house and the edge of the patio so we could have planted shrubs against the house.
We moved into our house before we landscaped the backyard, so there were terrible daily dust storms. Black gritty dirt would find its way into the house to alight on all the shiny new surfaces, and people were tracking in mud and dust on their shoes every time they entered or left the house. So we were in a rush to lay a patio and and grass as a defense against Dustbowl Living.
No. 6: Lay your pavers in a permeable base.

We set our patio in concrete, because at the time (during that hazy period of rushed decisions) I was thinking about weeds and about how I didn’t want to have to be constantly pulling them from between the cracks in the pavers. I knew from experience that weeds will grow in any crack. But.
There are several good reasons for a permeable surface. One is that rainwater will seep down between the cracks–good for the environment–fast. WIth an impermeable surface, like ours, water pools and we have to either wait for it to evaporate or go out there with a broom and sweep it off.
Another good reason to set stone in a base of sand and crushed stone is that it’s easier to change the layout later. For us to retroactively add planting beds against the house would require a jackhammer. It’s not going to happen.
No. 7: If you dream of a built-in ironing board, don’t give up on that dream.

A built-in ironing board was in fact a feature I planned to include in my remodel. But somehow…it never happened. So after spending all the money in the world to make my house perfect, I have an ironing board set up in the middle of the bedroom where I am in danger of tripping over a cord in the middle of the night.
No. 8: Don’t shortchange the laundry room.

My laundry room was an after-thought. The original remodel plans called for placing the laundry machines in a hallway where they would be sitting in full view of everyone who walked past. As this hallway led to two bedrooms and the guest bath, it didn’t seem like the most elegant solution.
But somehow construction got underway with the Visible Laundry Plan intact and it wasn’t until about a month into the process that I realized: those laundry machines need to be tucked away somewhere. In haste, we jerry rigged a laundry closet by stealing square footage from the master bedroom closet.
This move excited the contractor–can you say “change order?”–because although the area in question had not been built, it created an opportunity to throw around phrases like “structural changes” (aka: three two-by-fours) and very high dollar figures.
Anyway, we ended up with a laundry closet, nowhere to fold clothes, and a bad taste in our mouths.
Laundry is one of those things in life that you have to confront daily. Make sure you like your laundry room.
No. 9: Know where you are going to store the clothes hamper.
This is a minor annoyance, but again–a daily one. We did not set aside space in our clothes closet for a hamper, so now the hamper sits in the middle of the floor. I am constantly fussing with the hamper, trying to tuck it in here–under the hanging dresses–or there. But somehow it always manages to creep back into the middle of the closet.
No. 10: Ask the architect to double check the cabinet maker’s drawings.

About a month before the remodel was complete, after the cabinet maker had installed all the cabinets but before the windows had been trimmed, it was discovered that measurements were off by about two inches along one wall–there wasn’t enough room for window trim as drawn on the architect’s plans.
Crisis! The contractor started murmuring “change order” again like it was a magical incantation and was intimating urgency, as in “you have to OK the change order today or else the tile man can’t come on Monday and the whole job will be thrown off schedule.”
So we had to find a carpenter willing to come to the house on a Saturday to figure out an elegant fix and to trim the window (final cost: $125).
By the way, the tile man did not show up until Wednesday afternoon.
Are you still obsessing over the details, post-remodel? Tell us about it in the comments section below.
N.B.: Before you start a garden rehab, browse our Hardscape 101 design guides on Decks & Patios 101, Exteriors & Facades 101, and Fences & Gates 101 for tips that will help you avoid later regrets. See more of our editors’ o2n remodels:
- Rehab Diaries: Michelle’s Mill Valley Kitchen Redo.
- Christine’s Garden in London.
- Remodeling 101: Julie’s U-Shaped Kitchen.
- Alexa’s Bedroom Refresh with Farrow & Ball Paint.
- Remodeling 101: The Viking vs Wolf Range Debate.


Have a Question or Comment About This Post?
Join the conversation