
Like many people, I want cut flowers to grace my home at all times, and in most instances, a simple jar of in-season blooms feels like enough. But sometimes—be it a birthday, holiday, or with congratulatory intent—a bona fide flower arrangement is called for.
I’m going to guess that, like me, many readers have taken a stab at making a floral arrangement while wondering if they were doing it right. (With a supermarket bouquet, my technique involves placing the most delicate flowers in the center of a vase, the spiky ones on the outside, and then “artfully” messing it up with my fingers.)
But one day recently I went to Lambert Floral Studio in San Francisco for an informal class on tabletop arrangements (champagne was served). Maybe it was the bubbly, but while I watched studio owner Sammy Go demonstrate the essentials of floral design, I saw the clouds part: Suddenly, arranging not only made sense, but perhaps sounded fun.
We asked Sammy to share secrets of flower arranging that you can use for any arrangement. (The step-by-step instructions for the arrangement below will work no matter what flowers you use.) I hope his tutorial is as enlightening to you as it was to me.
Photography by Leslie Santarina for Gardenista.
Materials

What should you look for when you shop for flowers? First and foremost, seek out a variety of textures, says Sammy. Second, find variety in the shape of the bloom, and third, seek variety in color. For example: The ranunculus shown above are rough and circular with white bodies and purple edges, the daffodils are smooth and star-shaped with classic yellow centers, and the pale pink sweet peas are dainty and reminiscent of butterflies.

How to choose flowers? You want a balance of simplicity and visual impact, explains Sammy—so choose a pared-down color palette with a wider variety of flowers, or more color with fewer kinds of blooms.
- Flowers. Read our note on shopping for flowers at the bottom of this story; Sammy collected fritillaria, hellebore, hyacinth, sweet pea, daffodil, sweet almond branches, ranunculus, and calla lily leaves from the San Francisco Flower Mart.
- A medium-size vase. Pick something that’s neither tall nor wide, but in the middle. (See our note on vase selection below.)
- Floral shears. They’re inexpensive, so pick up a pair (such as these UltraSnip Shears for $10 on Amazon) for a lifetime of floral arranging, or in a pinch, use garden clippers, kitchen shears, or craft scissors—in that order.
- Chicken wire. Sammy used coated floral wire (Mesh Floral Netting; $5.30 on Amazon), but value-priced Poultry Netting ($6.48 from Home Depot) works too. (No wire? Try a plastic berry basket turned upside down.)
- Floral tape, like Oasis Clear Floral Tape; $4.63 on Amazon. (In a pinch, Scotch tape will do.)
- Optional: If you have a lazy Susan, prop your vase on it so you can easily monitor your creation from all sides.
Are you wondering how to take care of cut flowers? First, get them home and into water as soon as possible. Trim a quarter inch off the bottom. “There are other tips and tricks,” Sammy says, “but that’s the most important.” (Read our own tips and tricks in Tried and Tested: How to Make Fresh Flowers Last Longer.)
Trim the stems again while you’re arranging—one stem at a time, as you decide where to place each flower.
Preparation
First, choose your vase. “The shape of your vase will dictate the final outcome of your arrangement,” Sammy says. A tall, skinny vase might produce a stiff, columnar arrangement. With a low, shallow vase, you might end up with a droopy arrangement that looks as if stems are falling out of the pot. Choose something in the middle: a vessel whose edges can support some leaning stems, but with a height that isn’t too restrictive.
Next, form a chicken-wire base to fit the vase.


In floral design lingo, the chicken wire and tape are your “mechanics,” Sammy says: You’re creating a grid in which your flowers can nestle.
Assess your flowers and greenery and arrange them into four groups. (You’ll start your arrangement by placing the strongest, thickest stems, and end with the most delicate.)
- Frame: Use branches and twigs, large or firm leaves (such as sweet almond branches, calla lily leaves, quince, holly, winterberry, dogwood, magnolia, forsythia, willow, and cherry blossom).
- Foundation: Use relatively sturdy flowers with large blooms or broad faces (think hyacinth, hydrangea, dahlia, chrysanthemum, peonies, and gardenia).
- Focal point: Rely on more decorative flowers with relatively firm stems, these might be considered the “star” of the arrangement (like ranunculus, hellebore, lilies, tulips, carnations, anemones, aster, freesia, lisianthus, and roses).
- Floaters: Use the lightest flowers of all, these have a lyrical quality and delicate stems (like fritillaria, sweet pea, daffodils, poppies, columbine, cosmos, and pansies).
Assembly
If you are worried you can’t picture how you want the finished flower arrangement to look, let nature be your guide. Sammy often thinks of a flower arrangement as a micro-garden: the frame as trees and foliage, the foundation as background flowering shrubs, the focal points as the star flowers of the garden, and the floaters as the fleeting, short-season blooms to be enjoyed while they last.

Step 1
Begin with the stiffest, woodiest materials, to make a general frame you can use to support weaker stems. Your frame can (and should) be uneven: Some parts might be taller, others lower. Hold a branch next to the vase, trim it conservatively, hold it up again, and trim it again if need be. (Depending on your preference, you’ll want the tallest part of your frame to be one to two times the height of your vase.) When you insert the branches, some might lean against the vase, and others might be held up by the wire.
Step 2

Add large-leafed substantial greens. Fill empty pockets in the branchy frame, says Sammy: “Let your eyes follow the lines to find negative space, then insert something.” Here, he adds calla lily leaves, a common sight in San Francisco (ask your neighbor if you can trim a few, he suggests).

What if you make a mistake along the way? “Do not stress out, at this or any point,” Sammy says. “Nothing is permanent; you can always go back if you don’t like it.”
To minimize the need for dramatic revisions, look at your arrangement from all sides as you go along. “When you’re designing and your face is only 10 inches away from the flowers, everything feels more dramatic than it actually is,” says Sammy. “If it’s not working, don’t sweat it; just change directions instead of trying to force it.”
Step 3

Reach for your “foundation” flowers with large blooms next (here, the fluffy white hyacinth). “Treat them like a carpet,” and bury them, says Sammy. Cut these stems on the shorter side, identify empty spots in your structure, and fill them in. “These broad-faced flowers will continue to define the space while also covering your mechanics” like the tape and chicken wire, says Sammy.
Step 4

Next, reach for the “focal” blooms (here, ranunculus and hellebores). “These are the flowers that have a definite presence,” says Sammy, “and we’re not going to bury them.” These stems should be a little longer, so they stand out: “This is where you might try a spot, move the flower, then try somewhere else, fixing and tweaking the whole time.”
Let some of these flowers dip below the lip of the vase, suggests Sammy, because an arrangement looks more “alive and organic” when flowers appear to spill out. Plus, think about where your arrangement will ultimately live—at home. “An organic-looking arrangement will fit into the home better than one that looks stiff,” says Sammy.
Step 5
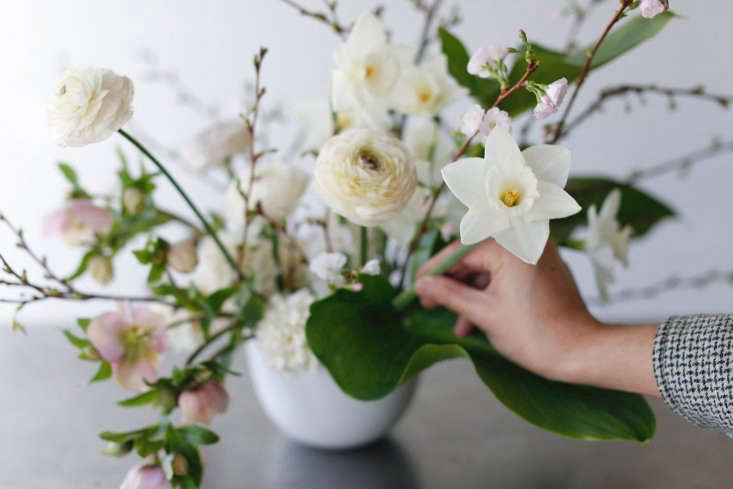
As a last step, reach for the “floaters” that have gestural qualities and delicate stems. They need to go in last, both for visual and practical purposes. “Had we put these in earlier, they might have been crushed by the stronger flowers,” Sammy says.

By now, the shape of your arrangement has been defined, and these unsturdy, “wobbly” flowers are the final touches: “Their movement is too fine to dictate the shape early on,” Sammy says.

The floaters are so slight that you can concentrate them in one area, if you like: As he inserts the daffodils, Sammy thinks aloud of the way wild daffodils crop up in spontaneous patches on the street. “I like to mimic that,” he says.
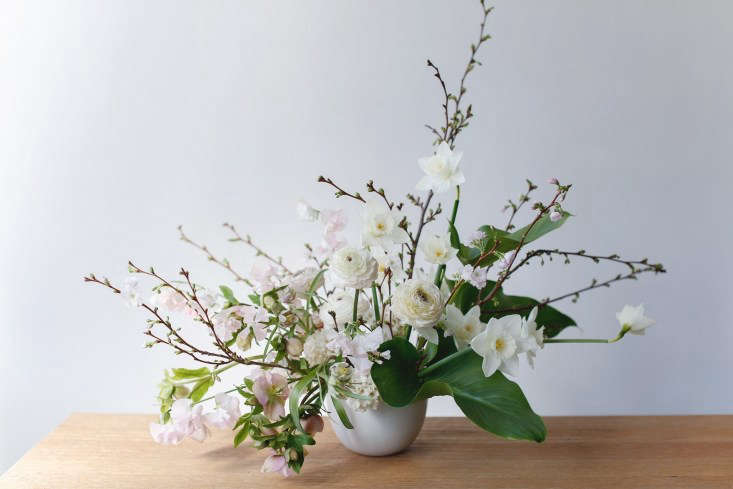
Flower Arrangement
Browse more Floral Arranging favorites on Gardenista, including:
- 10 Ways to Bring Nature Home with Sophia Moreno-Bunge
- Calla Lily: Rethinking a Bridal Bouquet Flower
- Instagram Bouquet-a-Day: A Self-Portrait in Flowers
- What’s Ahead in 2018: 10 Floral Designers to Watch This Year


Have a Question or Comment About This Post?
Join the conversation