Growing up, my best friends and I were always in our school plays. After performances our doting parents would dole out oversized bouquets; my friends had the habit of adorning their bedroom walls with the dried up remains. To be honest, even then I thought hanging bunches of dried roses looked morose. But who wouldn’t want to enjoy a bouquet’s beauty for just a bit longer?
Photographs by Erin Boyle.

Last weekend, after a Valentine’s Day arrangement of pink-edged spray roses began to droop in its vase, I decided to keep them around a bit longer and turn a withered bouquet into a festive garland.

Drying works best with roses that have already had time to unfurl, so enjoy your roses in the vase for as long as it takes for them to loosen a bit. Mold can develop if you attempt to dry buds that haven’t yet opened.

To make my garlands, I began by clipping the heads off my opened roses, leaving a little less than an inch of stem.
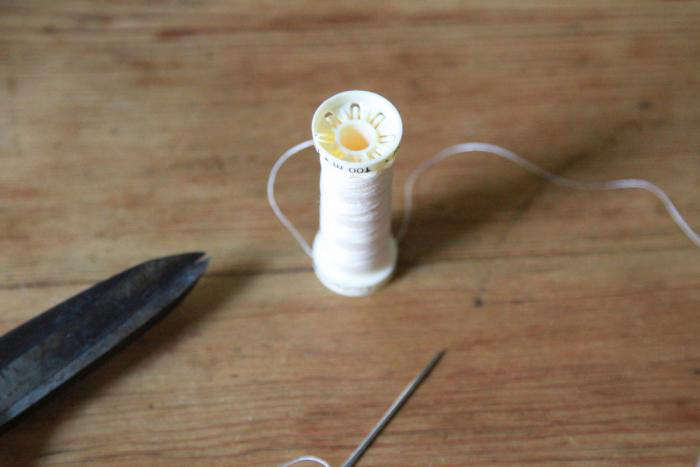
Because I wanted my garland to create the illusion of floating roses, I chose a thin thread in an off-white color. If you’re making a garland for a dark wall, you might choose a thin thread in a color to match.

I used an upholstery needle to thread directly through the stem of each rose. Threading the stems rather than just tying them will make them more likely to stay put as the stem dries and loses some of its heft.

After I threaded each rose, I wrapped my thread several times around the stem and tied it off to make sure the flowers would stay evenly spaced. In some cases, I strung two roses right next to each other and wrapped both stems at once.

When I finished stringing all the roses, I hung the garlands vertically from a piece of masking tape to allow them to finish drying. Because the spray roses are so tiny, they only took a few days to dry completely.
I worried that too much pink might be overwhelming hanging above the couch in my small apartment, but the drying process has tempered the hues a bit. So far, I’m enjoying the unexpected blush of color.
See more rose-colored inspiration here.
Finally, get more ideas on how to successfully plant, grow, and care for rose with our Rose: A Field Guide.
Finally, get more ideas on how to plant, grow, and care for various perennial plants with our Perennials: A Field Guide.


Have a Question or Comment About This Post?
Join the conversation